
Definition of terms
-
CloudStream Device Management (DM): In the context of this manual, this is the part of CloudStream developed by Ricoh and accessed at https://cloudstream.ricoh-gse.com/admin.html.
-
CloudStream Print&Scan (PS): In the context of this manual, this is the part of CloudStream developed by Y Soft.
Limitations
Reporting integration
-
Reporting data are propagated in fire and forget manner - when CloudStream service is unavailable or when there is a connection problem during the data propagation, the request is not repeated.
-
Scan and copy reporting data are propagated only when performed on a cloud terminal.
-
An MFD can only be deleted by uninstalling the DM agent and deleting the MFD from CloudStream.
Access control
-
You can assign access roles to individual users only after they log in to CloudStream via the CloudStream Web UI or the CloudStream Client or at the MFD.
-
The authentication provider RICOH CloudStream does not fetch user groups from RICOH CloudStream DM.
-
You can only assign security roles to individual users, not to CloudStream DM user groups.
-
If you make changes to the group membership of a user in an authentication provider like Microsoft Entra ID, these changes will only be synchronized to RICOH CloudStream DM. That means that when you exclude a user from a group, the user won't have access rights to log into RICOH CloudStream DM. However, the user will still be able to log into RICOH CloudStream PS and MFD.
-
Initial setup (onboarding)
Prerequisites
-
Y Soft technician: access to the root vendor in the desired CloudStream Print&Scan environment.
-
Ricoh operator: access to global service settings in the desired CloudStream Device Management environment.
Obtaining onboarding information from CloudStream Device Management UI
This part is for the Ricoh operators. Alternatively, it can be carried out by a Y Soft technician with access to CloudStream Device Management UI.
-
Log in to CloudStream Device Management UI with your global administrator account.
-
Go to Global Service Settings > URL Configuration.
-
Obtain the URL of the M-ServiceLocator service.
-
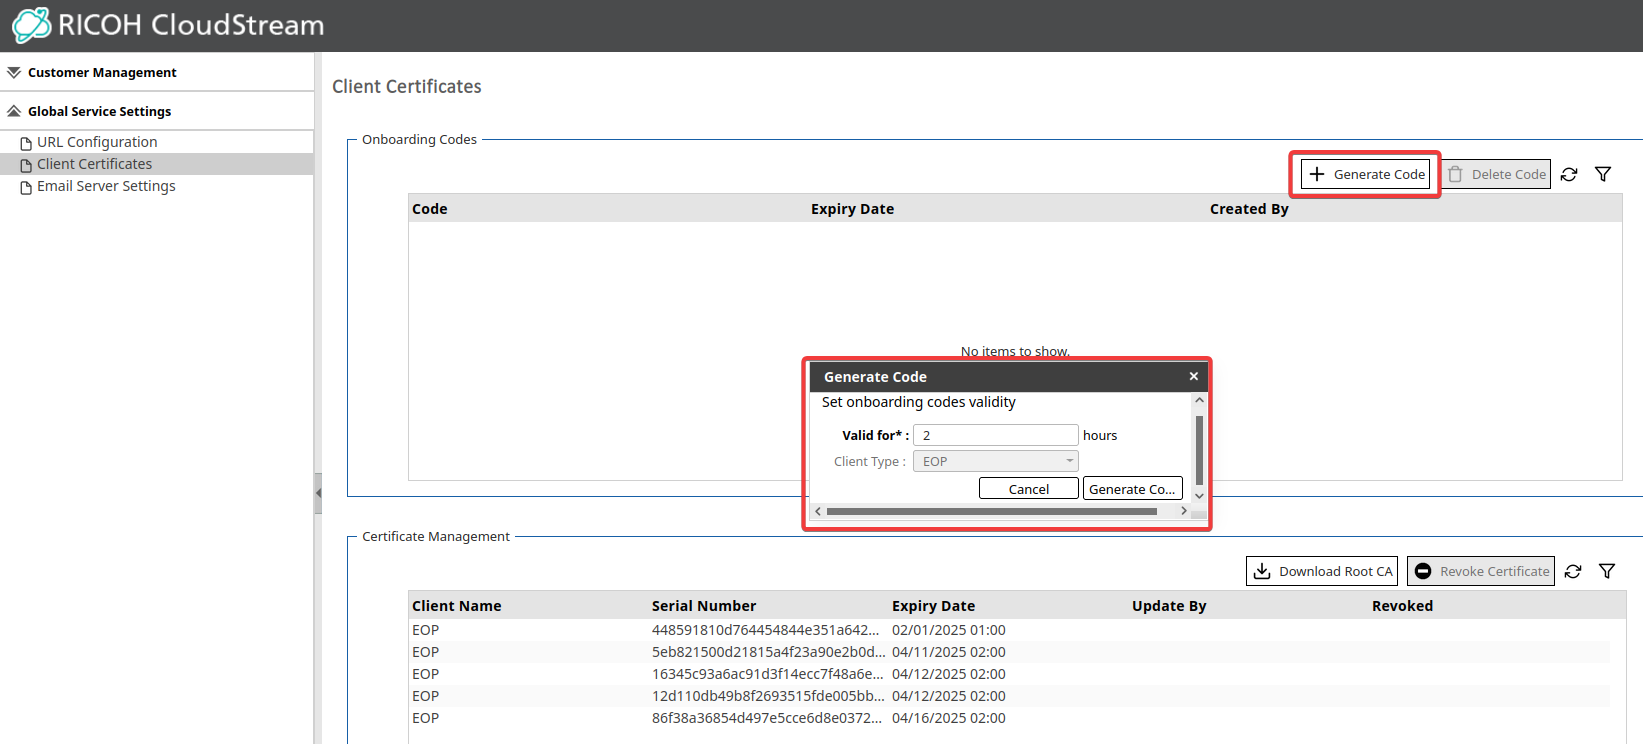
Go to Global Service Settings > Client certificates.
-
Generate a new Onboarding code. You can leave the validity at its default value of 2 hours.
-
Provide both the URL of M-ServiceLocator and the Onboarding code securely to Y Soft technician.
Initial integration in CloudStream Print&Scan Web UI
This part is for Y Soft technicians.
Enabling the feature flag for managing the CloudStream service
For the root vendor of the environment, enable the ManageRicohCloudstream feature flag. Do not enable UseRicohCloudstream flag on the root vendor.
Prerequisites:
-
You have an API key with admin access and ModifyLicense permission for this account, or any account above in the CloudStream tree.
-
You have the feature enablement command-line utility called CloudStream-feature-util.exe installed on your workstation.
How to:
Run the following command:
<ac:structured-macro ac:name="scroll-conditional-content-inline" ac:schema-version="1"><ac:parameter ac:name="content">SAFEQ Cloud</ac:parameter><ac:parameter ac:name="labels">safeq_cloud</ac:parameter></ac:structured-macro><ac:structured-macro ac:name="scroll-conditional-content-inline" ac:schema-version="1"><ac:parameter ac:name="content">Dispatcher Paragon Cloud</ac:parameter><ac:parameter ac:name="labels">dipa_cloud</ac:parameter></ac:structured-macro><ac:structured-macro ac:name="scroll-conditional-content-inline" ac:schema-version="1"><ac:parameter ac:name="content">CloudStream</ac:parameter><ac:parameter ac:name="labels">cloudstream</ac:parameter></ac:structured-macro><ac:structured-macro ac:name="scroll-conditional-content-inline" ac:schema-version="1"><ac:parameter ac:name="content">pmc</ac:parameter><ac:parameter ac:name="labels">pmc</ac:parameter></ac:structured-macro>-feature-util.exe --api-key=<APIKEY> --account-domain=<DOMAIN> --feature=ManageRicohCloudstream=true [--primary-address=<PRIMARY_ADDRESS>]
-
<APIKEY> is the admin API key from the specified account or any account/vendor above it in the CloudStream tree.
-
<DOMAIN> is the account domain name where you want this feature flag enabled.
-
<PRIMARY_ADDRESS> is the optional primary server address (if not specified, an account domain will be used).
Setting up the CloudStream service
The CloudStream service does not currently have cluster capabilities. Therefore, it runs only on a single primary node. When setting it up, choose any online server; it does not matter which one. However, consider excluding nodes that are reserved and might be shut down.
-
Log in to CloudStream Print&Scan Web UI.
-
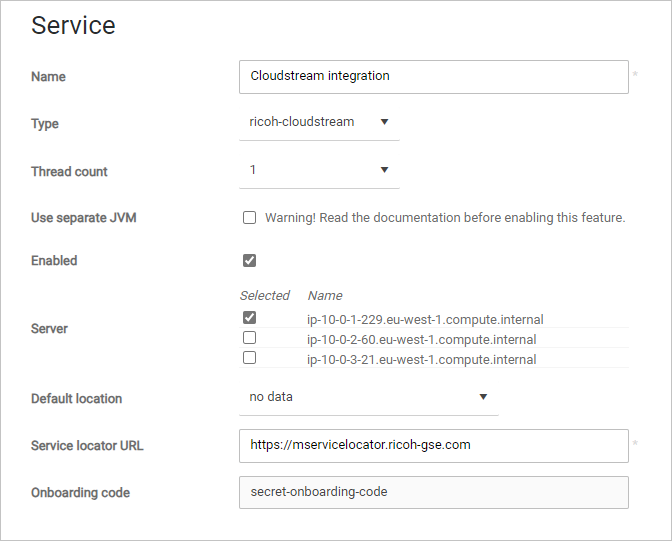
In the navigation tree, go to any primary server located under the root vendor account, click Services, and then click Add.
-
Fill in the required fields:
-
Enter the name of the service.
-
In Type, select ricoh-cloudstream.
-
The Enabled checkbox must stay selected.
-
In Server, only one server must be selected.
-
In the Service locator URL, enter the URL obtained from CloudStream by the Ricoh operator.
-
In Onboarding code, enter the code obtained from the Ricoh operator.
-
Click Save.
-
-
The Ricoh CloudStream service will start to obtain address services' URLs from the Service locator in the background. Wait approximately 5 minutes for the process to finish.
If you go to the service detail, you will see Starting in the Service status.
After successfully obtaining the URLs, the logs will show "Obtained services urls from locator service." -
After obtaining the URLs, the service will start to obtain the certificate.
After a certificate was successfully obtained, the logs will show "Certificate was generated successfully for HcpServer." See the Obtaining logs section of this manual.
If you go to service details, you will see Running in the Service status. This also means the service was able to connect to the Notification service and obtain notifications from CloudStream. You can also verify this by checking for the "Received {number} notifications to process" message in the logs.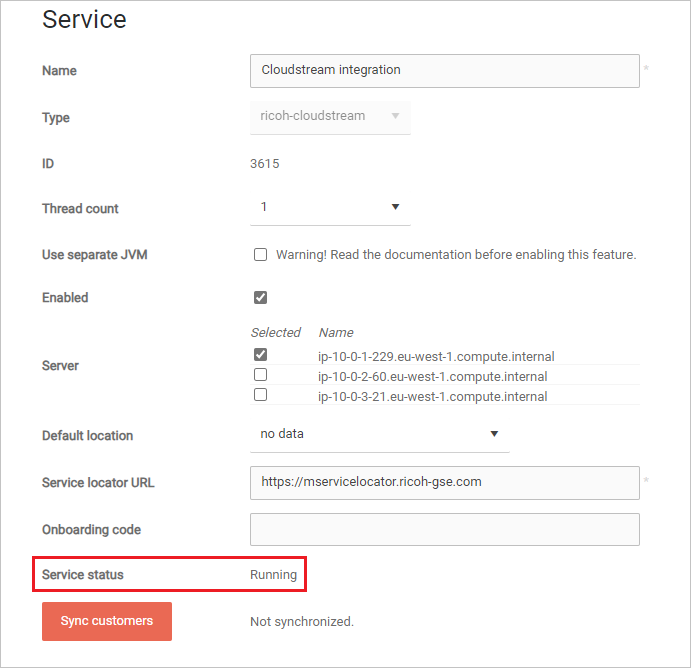
-
After that the service should be fully onboarded and the integration working.
Note that once the onboarding is complete, you cannot onboard the service again, even if you change the onboarding code afterwards. If you need to re-onboard it (for example, because the certificate was revoked and the integration is therefore not working) you must delete the service and add it again.
Creating a Ricoh vendor account
You will need a vendor account that will aggregate the CloudStream customers. If it does not exist in the Ricoh CloudStream Print&Scan environment already, create it. There might be multiple vendors for that purpose. If necessary, ask Y Soft Marketing or Frontline. For each CloudStream vendor, do the following:
-
Enable UseRicohCloudstream and RicohCloudStreamBranding feature flags.
-
Create a local user with the Administrator role assigned in Access control.
-
Provide the credentials of the admin user to Ricoh operator in a secure manner. We recommend changing the password at first login.
Do not enable UseRicohCloudstream and RicohCloudStreamBranding feature flags on vendors other than those specifically used for the CloudStream purpose. Also, do not enable it on the environment's root vendor. Only ManageRicohCloudstream flag should be enabled there.
Troubleshooting
Error states in the CloudStream service
You might encounter various error states displayed in the service details:
-
Stopped – The service is disabled and not running. Go to the service details and make sure the Enabled checkbox is checked. If the issue persists, contact Y Soft RnD.
-
Connection to the service locator failed – The service is unable to connect to the service locator during initialization. Check that the Service Locator URL and the Onboarding code are correct. Also, check that the CloudStream Service Locator and Security services are up and running on the CloudStream side.
-
Connection to the notification server failed – The service is either unable to get notifications, or the notification server is returning an error code. Check that CloudStream Notification service is up and running on the CloudStream side.
-
Failed to start – The service failed to initialize. Check the logs and contact Y Soft.
If you need additional information, see the logs.
Incorrect address in the Service locator URL field
In case of an incorrectly filled address, the logs will contain the error message: "UnknownHostException (java.net.UnknownHostException: No such host is known) or ConnectException (example below - java.net.ConnectException: Connection refused: no further information: <address>)."
Examples:
[ERROR] 2023-01-18 10:36:05.836 {-12-2} hCloudstreamClient - Client was unable to connect to the service (Check your service locator URL in RicohCloudstream service setting)
java.net.ConnectException: finishConnect(..) failed: Connection refused: localhost/0:0:0:0:0:0:0:1:9448
    at org.asynchttpclient.netty.channel.NettyConnectListener.onFailure(NettyConnectListener.java:179) ~[async-http-client-2.12.1.jar:?]
[ERROR] 2023-01-18 10:16:18.542 {d-123} hCloudstreamClient - Client was unable to connect to the service (Check your service locator URL in RicohCloudstream service setting)
java.net.UnknownHostException: localhooost: Temporary failure in name resolution
    at java.net.Inet6AddressImpl.lookupAllHostAddr(Native Method) ~[?:?]
Periodically, the logs will also show "RicohCloudstreamClientException (No service URL cached for <contacted service>)." It will appear repeatedly until the URL is fixed or the connection is restored (depending on the problem).
Solution: Check if the address is correct (UnknownHostException usually means incorrect domain name). If the address is correct and it is still unable to connect, it is likely a network problem or Ricoh CloudStream services issue. If you haven't discovered any network issues, try saving the service later.
Incorrect onboarding code
If the onboarding code is incorrect, the client will repeatedly log the "Request validation" error and the "RicohCloudstreamBackendException" error.
[ERROR] 2023-01-18 10:41:08.299 {d-106} hCloudStreamClient - Request validation error. Invalid parameters were provided (e.g. onboarding code).
[WARN ] 2023-01-18 10:41:08.299 {d-106} GenerateAndStoreCertificate      - Certificate generation failed for HcpServer, req=GenerateClientCertificateRequestImpl(Some(9999),Some(<ac:structured-macro ac:name="scroll-conditional-content-inline" ac:schema-version="1"><ac:parameter ac:name="content">Y Soft</ac:parameter><ac:parameter ac:name="labels">safeq_cloud</ac:parameter></ac:structured-macro><ac:structured-macro ac:name="scroll-conditional-content-inline" ac:schema-version="1"><ac:parameter ac:name="content">Konica Minolta</ac:parameter><ac:parameter ac:name="labels">dipa_cloud</ac:parameter></ac:structured-macro><ac:structured-macro ac:name="scroll-conditional-content-inline" ac:schema-version="1"><ac:parameter ac:name="content">Ricoh</ac:parameter><ac:parameter ac:name="labels">cloudstream</ac:parameter></ac:structured-macro><ac:structured-macro ac:name="scroll-conditional-content-inline" ac:schema-version="1"><ac:parameter ac:name="content">Ricoh</ac:parameter><ac:parameter ac:name="labels">pmc</ac:parameter></ac:structured-macro>),Some(Print3rdParty),None,None,None)
com.nps.eopng.services.ricoh.CloudStream.client.exceptions.RicohCloudstreamBackendException: Backend responded with errorCode=1000 and message: Bad Data - Invalid request data.
    at com.nps.eopng.services.ricoh.Cloudstream.client.RicohCloudstreamClient.parseBaseResponse(RicohCloudstreamClient.scala:340) ~[eopng-services-ricohCloudstream-3.29-rc-11-g1ea93fb6c7.dirty.jar:3.29-rc-11-g1ea93fb6c7.dirty]
Solution: The onboarding code is incorrect. Check whether you have filled in the correct value. Alternatively, the code may have expired in the meantime. In that case, obtain a new onboarding code.
Cannot connect to another service (other than Service locator)
If the CloudStream service cannot connect to any other service, it will also show "ConnectException", and show to which address it cannot connect. The problem might be in the service locator URL as above, but with a higher probability that the problem is on the server side.
New customer setup – URL mauth service domain is not synchronized correctly in the authentication provider
If you, as the Ricoh operator, cannot see the domain, ask Y Soft to run the synchronization.
Instructions for Y Soft technicians:
-
In the CloudStream tree, navigate to the primary server with the CloudStream service.
-
In the service detail view, click Synchronize Accounts, and wait for the result. If the synchronization of any customers fails, check the logs for further info, such as which customer hasn't synchronized.

-
Alternatively, to avoid blocking the customer setup, you can input the mauth address manually in the Authentication provider details. Obtain the URI from CloudStream Device Management UI.
Customer synchronization with Ricoh CloudStream
This part is for Ricoh operators.
Prerequisites
-
Integration between CloudStream Device Management and CloudStream Print&Scan has already been set up and initialized.
-
The customer must exist in CloudStream Device Management already (but not configured for integration).
Setting up client registration in CloudStream Device Management UI
-
Log in to customer-specific CloudStream Device Management UI with your customer administrator account.
-
Go to System > Security > Client Registration.
-
Click Add.
-
Fill in the required fields:
-
Client Name can be arbitrary
-
Client ID can be arbitrary, but must be unique across the environment.
-
Client Secret can be arbitrary, but with good enough entropy
-
In Redirect URIs, enter the Callback domain for custom application. You will need this for setting up an Authentication provider in CloudStream Print&Scan Web UI. There should be two URIs based on the callback domain separated by comma - one suffixed with /callback/oidc-login and second suffixed with :8443/callback/oidc-login
An example of Redirect URIs value: https://customer.eu.ps.cloudstream.ricoh.com/callback/oidc-login, https://customer.eu.ps.cloudstream.ricoh.com:8443/callback/oidc-login -
In Scopes, enter your desired scopes, typically opened, profile, offline_access, email.
-
-
Click Save.
Creating the customer account (tenant) in CloudStream Print&Scan Web UI
-
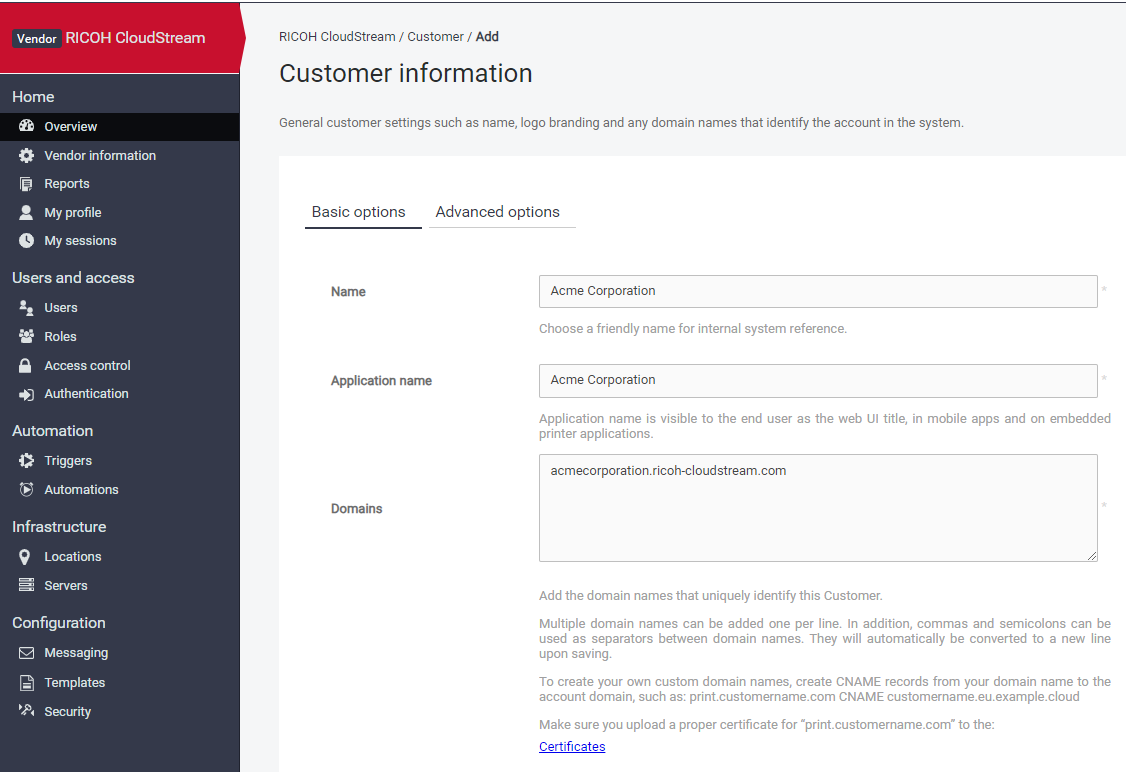
Log in to the CloudStream Print&Scan Web UI, click Create new, and select Account.

-
Fill in the Name and Application name. For more details about these fields, see Quick start for vendors.
-
The Domain should be in format <customer-subdomain>.<Ricoh-CloudStream-domain>, where <Ricoh-CloudStream-domain> is the domain of your root vendor account. Alternatively, you can choose any other valid domain or domains. Be aware that the first domain that you enter in this field will be used to connect the tenant to the customer account in CloudStream Device Management UI.
-
Click Save.
If you change the order of the account domains on the Customer information page, you must also change the M-Print for PMC domain for that customer in CloudStream Device Management UI to correspond to the first domain on the Customer infromation page.
Configuring authentication
-
In the newly-created customer, navigate to Authentication, and click Add.
-
In Type, select RICOH CloudStream.
-
In Name, enter the name of the authentication provider. This will be shown on the CloudStream login page.
-
In Domains, enter the list of allowed domain names under which the users can log in. For example, if the customer has email addresses ending with @acme.com, enter acme.com.
If you enter an asterisk (*), it will act as a wildcard symbol and will allow all domain names.
-
You can fill the M-Auth service address field manually or leave it to be filled automatically with the next notification of the Ricoh CloudStream service (if the service is onboarded).
-
The Client ID and Client secret are values from the CloudStream Device Management UI that you've set up in the previous steps.
-
The Callback domain for custom application can be any value from the available list, but it must correspond to the value that you have set previously in the CloudStream Device Management UI.
The listed values are taken from both the domains of the environment's root vendor and the domains of the current customer.
-
Enable the Show on Login page toggle if you wish to show the Authentication button on the Ricoh CloudStream Print&Scan login page.
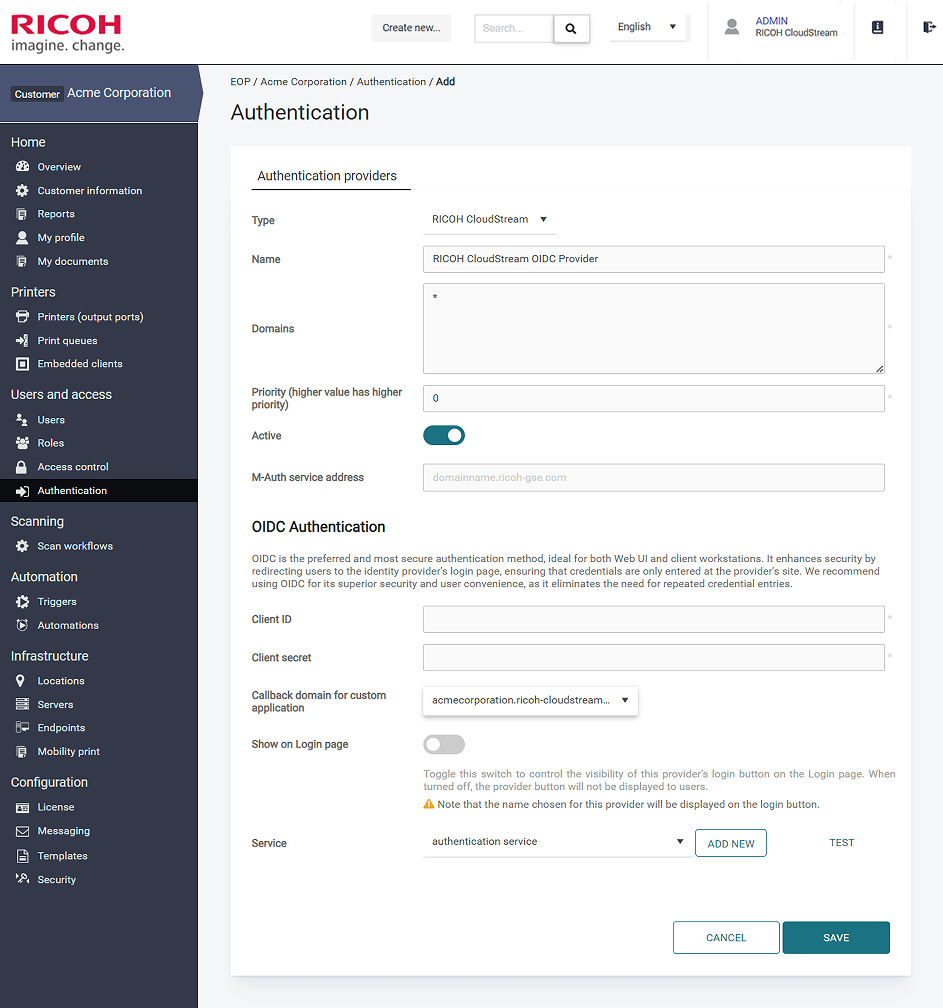
-
Click Save.
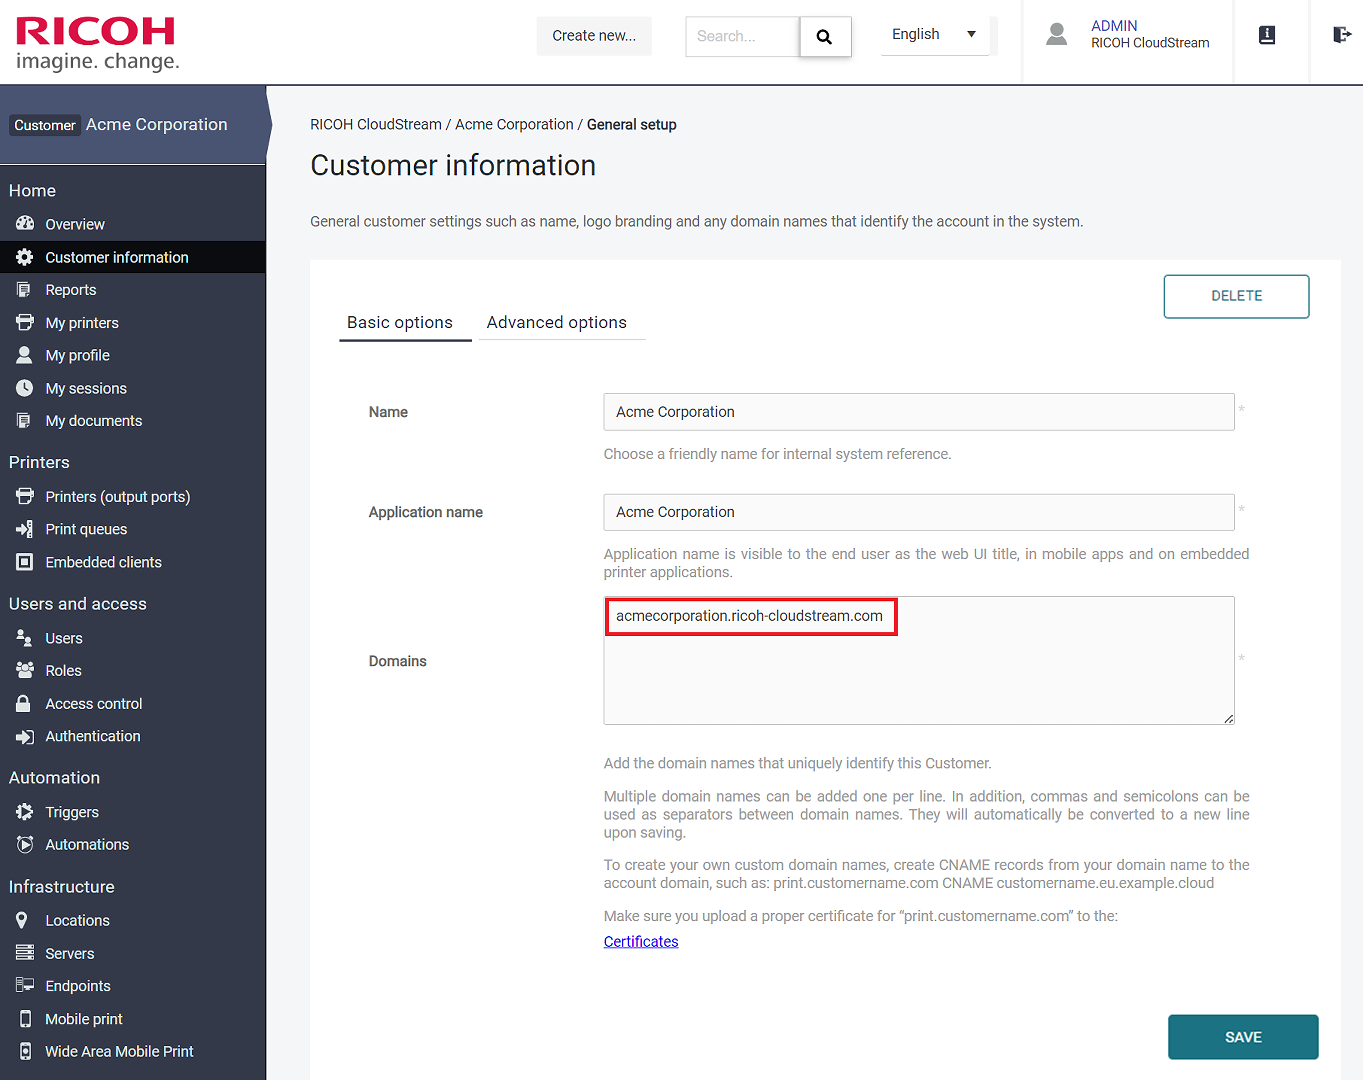
Obtaining information for configuration in CloudStream Device Management UI
-
Go to Customer information.
-
Copy the domain. If there are multiple domains, copy the first one in the list.
-
Obtain an API key:
-
Go to Security > API access keys and click Add.
-
In Type, select Embedded.
-
Enter the name of the API access key.
-
Enable Automatic endpoint trust.
-
Copy the value and store it securely.
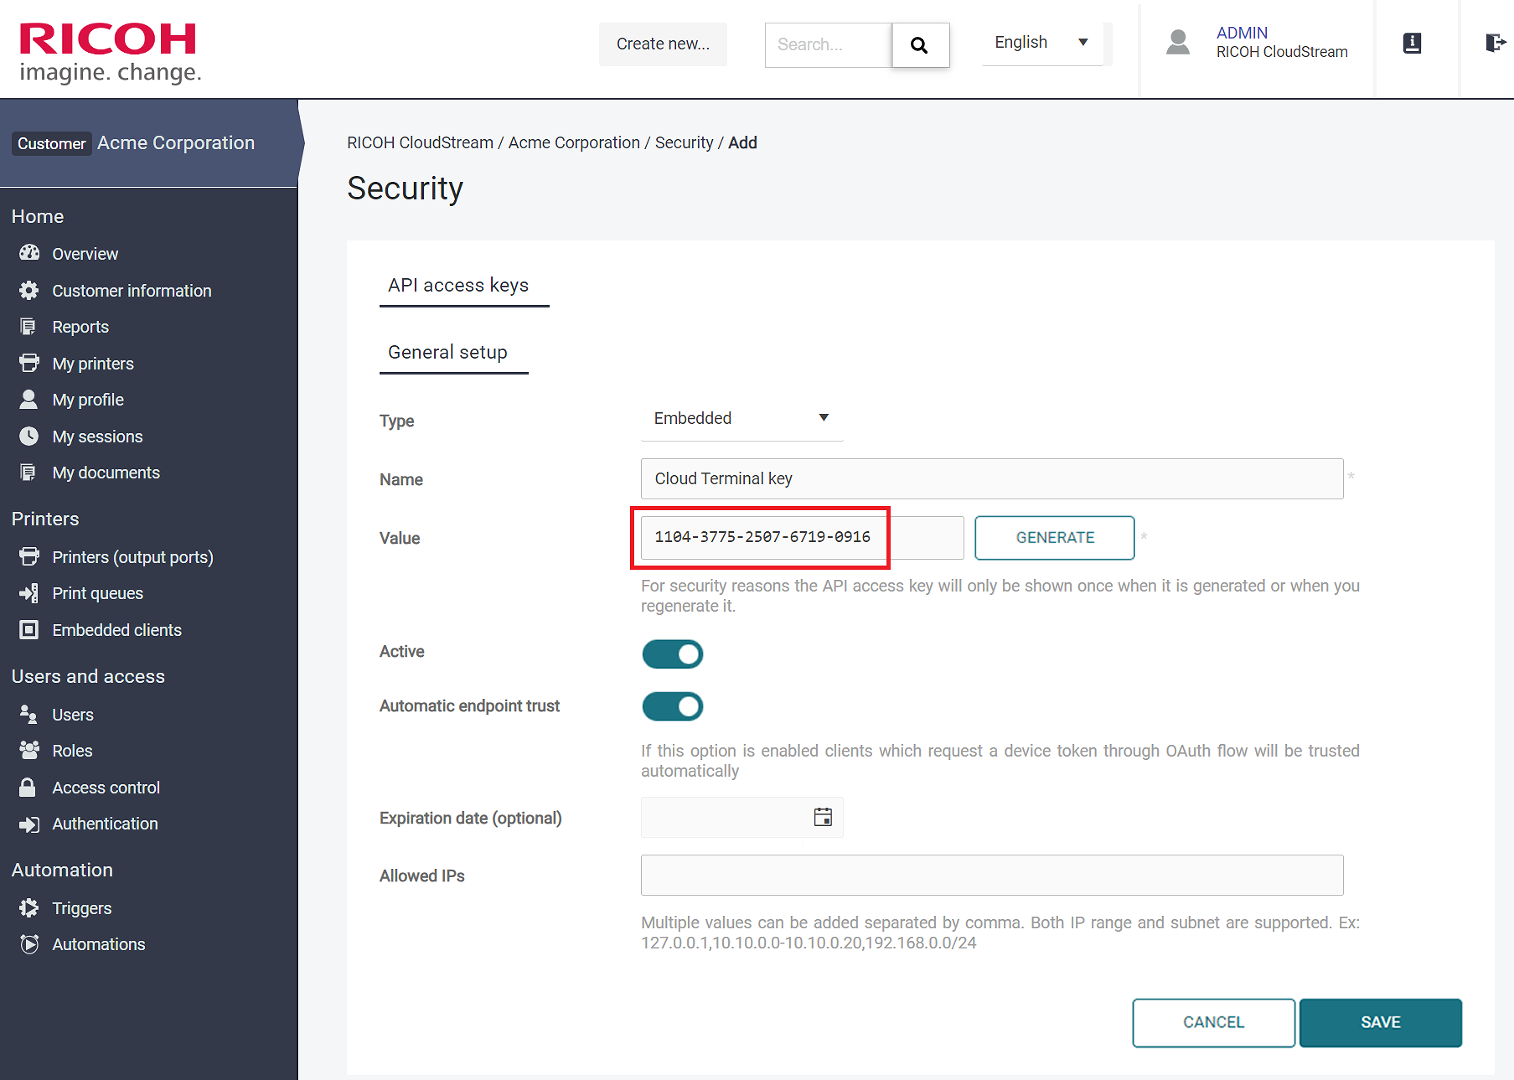
-
Click Save.
-
Configuring the customer in CloudStream Device management UI
-
Login to CloudStream Device Management UI with your global administrator account.
-
Go to Customer Management > Customer.
-
Select the respective customer from the list.
-
Open Customer URL in the Edit - Customer side-panel
-
In the M-Print for PMC field, enter the customer's account domain that you have copied from the CloudStream Print&Scan Web UI.
-
In the API key field, enter the API key that you have created in the CloudStream Print&Scan Web UI.
-
Click Save.
-
The new customer account is now configured in both systems and ready to be used.