
Use the Microsoft SharePoint Online (OAuth 2.0 with user-based access) type connector to deliver scanned files to a location in a selected Microsoft SharePoint Online document library with user-based authorization.
If you wish the users to authorize in advance (before going to the terminal), you can:
-
Share an authorization link displayed in the connector configuration.
-
Advise the users to use the Authorizations tab in Personal > My profile section of CloudStream Web UI.
Integration is done using Graph API. Access is granted on per user basis using OAuth2 Authorization Code Flow, authorization is secured via Proof Key for Code Exchange (PKCE).
The following permissions (scopes) are needed:
|
Scope |
Description |
Reason |
|---|---|---|
|
Sites.ReadWrite.All |
Allow the application to edit or delete documents and list items in all site collections on your behalf. |
To be able to upload and modify (create folders, append into files) content on the user's behalf. |
|
offline_access |
Maintain access to data you have given it access to. Allows the app to see and update the data you gave it access to, even when users are not currently using the app. This does not give the app any additional permissions. |
To keep access working even after one hour. |
Connector configuration
You can find the link for users to initiate authorization of the connector in this section.
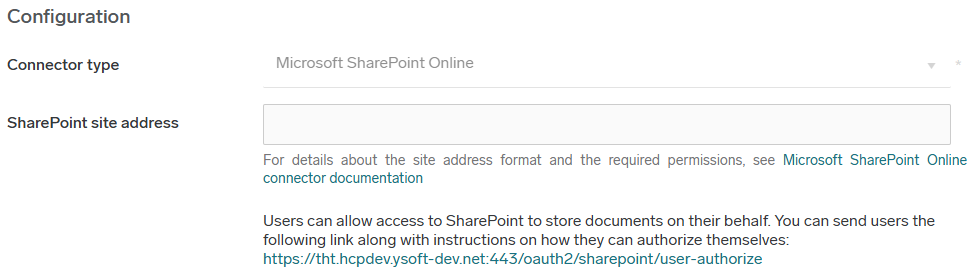
SharePoint site address – Define the site address you want your scans to be delivered to.
-
Leave empty in case you wish to use the default site.
-
If you use a custom site, the address of the site will have this form:
https://myCompanyName.sharepoint.com/sites/<mySite>/<myOptionalSubsite>/<myDocumentLibrary>/Forms/AllItems.asp-
The part of the address that you need to enter in SharePoint site address is
sites/<mySite>/<myOptionalSubsite>
-
Example: If the address of your SharePoint site is https://acme.sharepoint.com/sites/HR/hiring/templates/Forms/AllItems.asp, the SharePoint site address will be sites/HR/hiring.
-
If you use subsite under the default SharePoint site, the address will have this form:
https://myCompanyName.sharepoint.com/<myOptionalSubsite>/<myDocumentLibrary>/Forms/AllItems.asp.-
The part of the address that you need to enter in SharePoint site address is
<myOptionalSubsite>
-
Example: If the address of your SharePoint site is https://acme.sharepoint.com/legal/templates/Forms/AllItems.asp, the SharePoint site address will be legal.
-
If your site is not on your tenant’s default host name, enter the full site URL including the host name. A relative path is always resolved against the default host name, so the full URL is needed for Multi-Geo tenants.
-
Enter the address of the site only. Remove the document library and the page part of the address; the library is set in the workflow’s Target SharePoint Online Library field.
-
Example: For a Multi-Geo tenant, the SharePoint site address will be https://acmeEUR.sharepoint.com/sites/HR/hiring.
-
You can also enter the Microsoft Graph site identifier of the site, in the form
<hostName>,<siteId>,<webId>. See the section Obtaining the real name of the SharePoint library below for how to obtain it.
Example: acme.sharepoint.com,779cddfd-cef6-4d5a-b361-387183042c00,b9423f0d-e151-4e78-897d-5f2271751d39
If the site cannot be found, the delivery fails with the error code SHAREPOINT_0003.
Workflow configuration
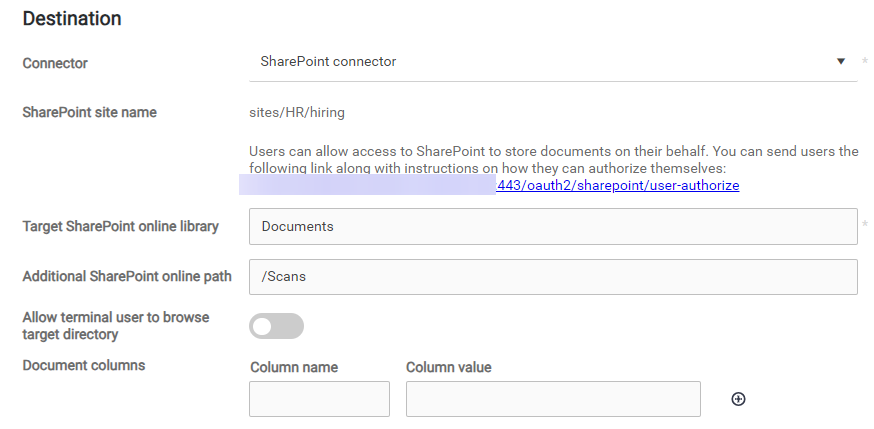
Example:
-
In Connector, select your SharePoint connector.
-
The SharePoint site address is taken automatically from the connector configuration.
-
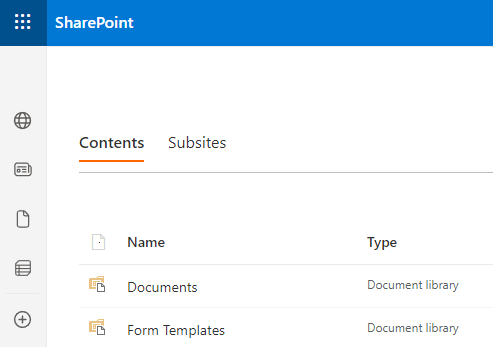
In Target SharePoint Online Library, enter name of the public SharePoint library. Be aware that the SharePoint library name is case-sensitive. Usually, at least the library "Documents" exists by default, so you can make an initial test using this library. The library name is taken from the Document Library, which the user can see on their SharePoint page.
The library name in the SharePoint URL and in the SharePoint UI may differ from the real name of the library. This may happen, for example, when your SharePoint is installed in languages other than English or when someone renamed the library. You can obtain the real name via Graph API.See the section Obtaining the real name of the SharePoint library below.
-
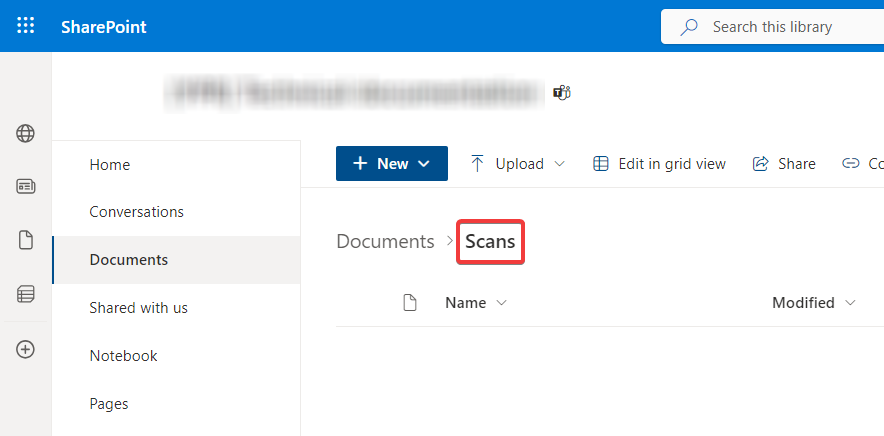
In Additional Sharepoint Online path, enter the directory where the workflow delivers scanned files, relative to the connector's document library. You can use Capture variables. Keep in mind the limitations of characters that are allowed to be in paths. Optionally, you can specify a path to a subfolder.
-
In Document columns, you can add an administrator-predefined document column to the corresponding SharePoint document metadata. The document column value must be a string in the format expected by the SharePoint column. Otherwise, the column value will not be saved. You can use variables in column values. Duplicate column names are not allowed.
Obtaining the real name of the SharePoint library
-
Go to https://developer.microsoft.com/en-us/graph/graph-explorer.
-
Log in with an account that has access to the library.
-
Search for the site using the following query:
https://graph.microsoft.com/v1.0/sites?search=<site>Example:
https://graph.microsoft.com/v1.0/sites?search=acme -
Locate your site and copy the site ID.
Example:acme.sharepoint.com,779cddfd-cef6-4d5a-b361-387183042c00,b9423f0d-e151-4e78-897d-5f2271751d39) -
List the document libraries using the following query:
https://graph.microsoft.com/v1.0/sites/<library id>/drivesExample:
https://graph.microsoft.com/v1.0/sites/acme.sharepoint.com,779cddfd-cef6-4d5a-b361-387183042c00,b9423f0d-e151-4e78-897d-5f2271751d39/drives -
Locate the document library in the response and use the "name" as the library name in the Target SharePoint Online Library field in CloudStream.